BABY SAFARI
This cake was made for the little Mini Mussa to be on September 20, 2007 in Martinez, CA.
DESIGN
My cousin, Omar, and his wife, Lela, are super easy when it comes to design. They really let me run wild with my ideas. For this cake I took the design straight from their online registry for the baby shower. They had choosen a safari animal nursery decor. I was able to mimic the theme on the cake based on online photos.
CAKE
The cake was a delicious pumpkin walnut spice very appropriate for Fall and also the same cake I made for their Fall wedding 5 years ago (see 2002 Omar & Lela Wedding ). For their wedding I actually created the recipe from several different ones I researched on the floor of Barnes & Noble Bookstore. I even adjusted it a little more for this baby shower cake.
FILLING / ICING
Cream cheese filling and icing, the same as for their wedding.
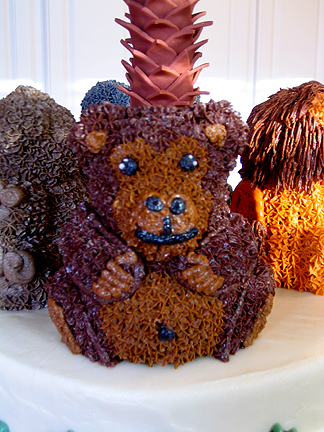
DECORATION
My better half, Blake, and my dearest sister, Denise, and I created a most dynamic design team and we were able to make all the cake decorations the day of the shower. The night before the shower, I assigned each person their design task for the next day. Denise was to make the candy animals and Blake to make the palm tree and I was to create the baby safari animals. They are both extremely talented with hidden cake decorating skills they never knew they had. Between the 3 of us, we were able to make decisions, avoid disaster and ultimately finish the cake on time and have a great time doing it !!!
SAFARI ANIMALS - Since the 3D froggies came out so well on 2006 Anika's 2nd Bday Cake, I thought the same idea could work for the baby safari animals. The 3D safari animals were made from the mini 3D teddy bear pan. You just carve a little here, add a little frosting there and whala - safari animals. Well, I have to admit that it was a little more complicated than that. In researching how to make the animals, I basically found a few animal cake pictures online and printed out a bunch of word clip art images to get a sense of what each animal looked like and their distinguishing features. I really wanted to do a giraffe, but the long neck was difficult on the short stubby bear pan. I would have had to put on a false neck and really didn't want to hassle with that, so I stuck to animals with short necks, like the rino, elephant, monkey and lion. Actually, I was originally going to make a baby hippo, but then thought it might not be recognizable since they don't really have a strong physical characteristic except for being fat with a big snout. So, with input from the design team, I ended up doing the baby rino with it's pointy horn at the last minute. When actually making the baby animals, I kinda had to wing it and just see how it went. Everything came out the first time around, except the monkey's face, which I had to scrape off and do again.
PALM TREE - The palm tree was made using colored fondant, hollow plastic tube, florist wire, florist tape, styrofoam ball and green candy melts. I made the trunk several days ahead using a hollow plastic clear cake pillar covered in a single layer of fondant. Then I cut out brown fondant hearts and layered them over the base fondant with the point side up to create the jagged trunk. For the palm leaves, I used a large leaf cutter then pressed into a leaf veiner to create the pattern and finally cut out slivers to create the jagged edge. They aren't exact, but they resemble palm leaves close enough. I had a basic idea of how I wanted it to look, but no clue how to assemble it. That's why I assigned the task to Blake, my true companion who puts up with all my cake endeavors :-) To assemble the tree, Blake tried several methods and finally decided on one, for which he had to make a quick run to Michael's to get the supplies. He covered a small spherical styrofoam ball with florist tape, then "glued" long florist wire under each leaf with candy melts. At the baby shower, he assembled the tree by sticking the wires from the leaves into styrofoam ball and placing it on the trunk. He then stuck all the wires into the hollow trunk and the ball was basically held in place by the weight of the leaves.
CANDY ANIMALS - I had previously shown Denise how to make the favors for her wedding using single color chocolate melted and poured into candy molds. The animals for this cake were one step more complicated by using multi colored chocolate in a single mold. I quickly taught Denise how to make them and she went to town. The fun part was mixing the different chocolate and candy colors to create just the right colors for the animals.
The three of us really had an enjoyable, crafty, drizzly Saturday decorating this cake for our beloved cousins. It was made with much love and the prospect of future birthday cakes to come :-)